


1 用Blowfish创建了博客!泰裤辣!😄
2 博客修改
{{< alert “circle-info” >}}
所有例子中,/指主仓库根目录
我的网站目录在~/文/my-blog ,因此/themes/blowfish/指的是~/文/my-blog/themes/blowfish/
{{< /alert >}}
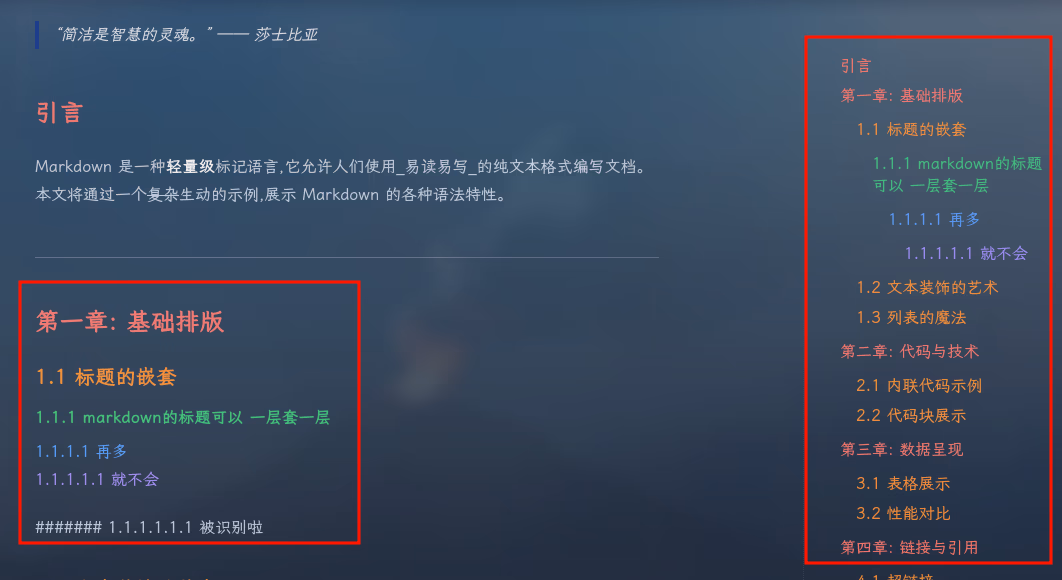
2.1 修改侧栏(TOC)和标题颜色
效果:
 新建
新建 /assets/css/custom.css
写入以下代码:
/* 浅色模式下的彩虹色标题 */:where(h2):not(:where([class~="not-prose"],[class~="not-prose"] *)) { color: #dc2626 !important; /* 红色 */}
:where(h3):not(:where([class~="not-prose"],[class~="not-prose"] *)) { color: #ea580c !important; /* 橙色 */}
:where(h4):not(:where([class~="not-prose"],[class~="not-prose"] *)) { color: #16a34a !important; /* 绿色 */}
:where(h5):not(:where([class~="not-prose"],[class~="not-prose"] *)) { color: #2563eb !important; /* 蓝色 */}
:where(h6):not(:where([class~="not-prose"],[class~="not-prose"] *)) { color: #9333ea !important; /* 紫色 */}
/* 深色模式下的彩虹色标题 */.dark :where(h2):not(:where([class~="not-prose"],[class~="not-prose"] *)) { color: #f87171 !important; /* 浅红色 */}
.dark :where(h3):not(:where([class~="not-prose"],[class~="not-prose"] *)) { color: #fb923c !important; /* 浅橙色 */}
.dark :where(h4):not(:where([class~="not-prose"],[class~="not-prose"] *)) { color: #4ade80 !important; /* 浅绿色 */}
.dark :where(h5):not(:where([class~="not-prose"],[class~="not-prose"] *)) { color: #60a5fa !important; /* 浅蓝色 */}
.dark :where(h6):not(:where([class~="not-prose"],[class~="not-prose"] *)) { color: #a78bfa !important; /* 浅紫色 */}
/* 浅色模式下的TOC彩虹色 */.toc ul ul li a { color: #dc2626 !important; } /* H2对应红色 */.toc ul ul ul li a { color: #ea580c !important; } /* H3对应橙色 */.toc ul ul ul ul li a { color: #16a34a !important; } /* H4对应绿色 */.toc ul ul ul ul ul li a { color: #2563eb !important; } /* H5对应蓝色 */.toc ul ul ul ul ul ul li a { color: #9333ea !important; } /* H6对应紫色 */
/* 深色模式下的TOC彩虹色 */.dark .toc ul ul li a { color: #f87171 !important; } /* H2对应浅红色 */.dark .toc ul ul ul li a { color: #fb923c !important; } /* H3对应浅橙色 */.dark .toc ul ul ul ul li a { color: #4ade80 !important; } /* H4对应浅绿色 */.dark .toc ul ul ul ul ul li a { color: #60a5fa !important; } /* H5对应浅蓝色 */.dark .toc ul ul ul ul ul ul li a { color: #a78bfa !important; } /* H6对应浅紫色 */2.2 字体修改
2.2.1 优点
此方法和文档中的相比,能让访问者从国内第三方网站下载字体,提高字体加载速率
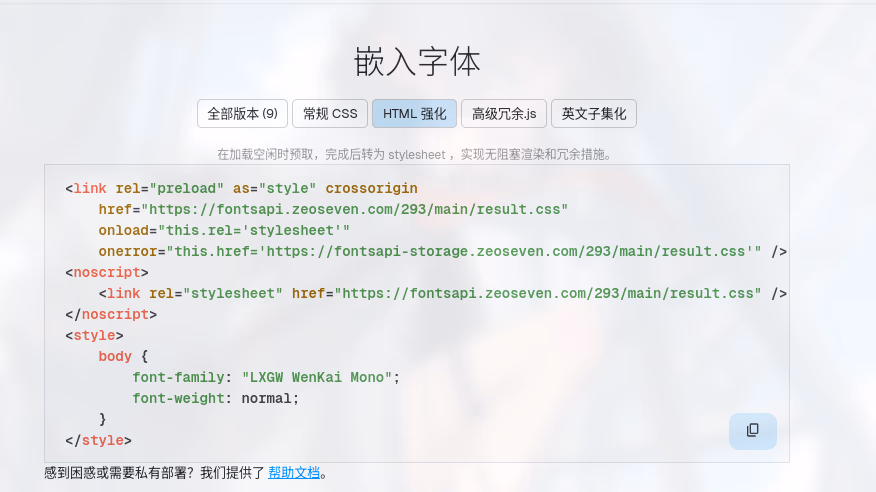
2.2.2 操作方法
从网站找到代码,比如:https://fonts.zeoseven.com/items/442/#embed
选中 HTML强化,用里面的代码进行导入
{{< alert “circle-info” >}}
在我这里,常规CSS无法使用,所以用HTML强化
英文子集化可以让所有英文显示为指定字体
全部版本可以展示所用可用的字型,可与选择适合的字型链接替代HTML强化中的链接
{{< /alert >}}
新建 /themes/blowfish/layouts/partials/extend-head.html
把内容放进去
最后差不多这个样:
<!--导入LXGW WenKai Mono字体--><link rel="preload" as="style" crossorigin href="https://fontsapi.zeoseven.com/292/medium/result.css" onload="this.rel='stylesheet'" onerror="this.href='https://fontsapi-storage.zeoseven.com/292/medium/result.css'" /><noscript> <link rel="stylesheet" href="https://fontsapi.zeoseven.com/292/medium/result.css" /></noscript>
<!--导入Maple Mono NF-CN字体--><link rel="preload" as="style" crossorigin href="https://fontsapi.zeoseven.com/442/main/result.css" onload="this.rel='stylesheet'" onerror="this.href='https://fontsapi-storage.zeoseven.com/442/main/result.css'" /><noscript> <link rel="stylesheet" href="https://fontsapi.zeoseven.com/442/main/result.css" /></noscript>
<style>/*无需专门导入字体,让所有英文显示为Maple Mono NF-CN字体@font-face { font-family: "ZSFT-ENMin-442"; src: url("https://fontsapi.zeoseven.com/442/main.woff2") format('woff2'), url("https://fontsapi-storage.zeoseven.com/442/main.woff2") format('woff2'); unicode-range: U+0061-007A, U+0041-005A, U+0030-0039, U+002E, U+002C, U+0021, U+003F, U+003A, U+003B, U+002D;}*/
/* (需专门导入字体)让所有正文显示为LXGW字体 */ body { font-family: "LXGW WenKai"; font-weight: normal; }
/* (需专门导入字体)让所有代码块显示为Maple Mono NF-CN字体 */code, kbd, samp, pre { font-family: "Maple Mono NF CN";}
</style>2.2.3 注意事项
如果你用git下载/管理的blowfish主题,修改/themes/blowfish(添加了/themes/blowfish/layouts/partials/extend-head.html)会遇到子模块冲突
下列子模组路径所包含的修改在任何远程源中都找不到: themes/blowfish
请尝试
git push --recurse-submodules=on-demand
或者进入到子目录执行
git push
以推送至远程。
致命错误:正在终止。~/文/my-blog (main|↑1|✔) [128]$你有两个选择:
选项 A: 保留你的字体修改,推送到子模块的 fork/分支
请见站内文章 《优雅地自定义 Hugo Blowfish 主题(或任何 Git 子模块)》
选项 B: 删除子模块,把字体修改直接保存到主仓库中
# 1. 回到主仓库根目录cd ~/文/my-blog
# 2. 移除子模块配置(但保留文件)git rm --cached themes/blowfishrm -rf .git/modules/themes/blowfish
# 3. 编辑 .gitmodules 文件,删除 blowfish 相关配置nano .gitmodules # 或用你喜欢的编辑器删除 blowfish 部分
# 4. 如果 .gitmodules 为空,删除它rm .gitmodules # 如果没有其他子模块的话
# 5. 将 themes/blowfish 作为普通目录添加git add themes/blowfishgit add .gitmodules # 如果修改了的话
# 6. 提交更改git commit -m "Convert blowfish theme from submodule to regular directory"git push2.3 字体大小修改
文档 有云:
我们也提供更改网站的字体大小的示例。 Blowfish 使这一切变得简单,因为它在整个主题中使用源自基本 HTML 语言的缩放字体大小方法。默认情况下,Tailwind 将默认大小设置为
12pt,但您可以将其更改为喜欢的大小。参考[上面的说明]({{< ref “#overriding-the-stylesheet” >}}) 创建一个
custom.css文件并添加以下 CSS 声明:只需更改此值,您网站上的所有字体大小都将调整为此新大小。因此,要增加使用的整体字体大小,请将该值设置为大于
12pt。同样,要减小字体大小,请将值设置为小于12pt。
我尝试了发现:主页字体调整了,但是博文字体大小未改变
我的方案是添加
/* 只针对文章内容提高文字大小,默认1rem */.prose { font-size: 1.1rem;}2.4 avif支持
你猜我为啥用avif
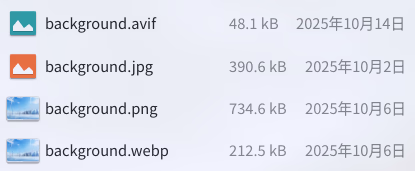 因为hugo对avif图片调节不完善,所以改成true增强AVIF支持:
disableImageOptimization = truedisableImageOptimizationMD = false #和上面的类似,改成AVIF增强AVIF支持disableImageOptimization对网站有效(比如我的博客的背景图)
disableImageOptimizationMD只针对博文文本有效
我true了disableImageOptimization似乎就对整个网站生效了,就这样吧。
2.5 评论区
配置指南
我修改了些许配置,见github
还get到了网址拆分这个功能(见博客内文章)
2.6 网站访问数统计
2.6.1 页头显示
效果如下:

这个组件的行为是由/themes/blowfish/layouts/partials/meta/views.html决定的,默认是使用Firebase的,但是Firebase国内访问不了,遂换成Vercount(这个能显示网站访问数 但是 不能显示喜欢数,但对我来说够了)
/themes/blowfish/layouts/partials/meta/views.html复制到/layouts/partials/meta/views.html
,这样会让blowfish读取后者而不是前者,从而实现自定义
完成复制操作以后,修改views.html内容,见 https://github.com/Sunrongguo2008/my-blog/blob/main/layouts/partials/meta/views.html 。这样会让views.html在实现原有的样式(眼睛+动画)的程度下,将Firebase替换为Vercount
编辑/config/_default/params.toml,把你想要的部分的showViews改成true
{{< alert “circle-info” >}}
[taxonomy]管理www.example.com/tags/ 域名
[term]管理www.example.com/tags/xxx/ 等域名
[list]管理www.example.com/posts/ 域名
{{< /alert >}}
⚠️注意:
{{< alert >}}
修改views.html后,每个页面只能显示一个网站访问数,其他无法加载。而在”Posts” “最近的文章” 等页面,[article]下的showViews打开以后,会统统显示,导致异常。所以[article]下的showViews请false。否则:
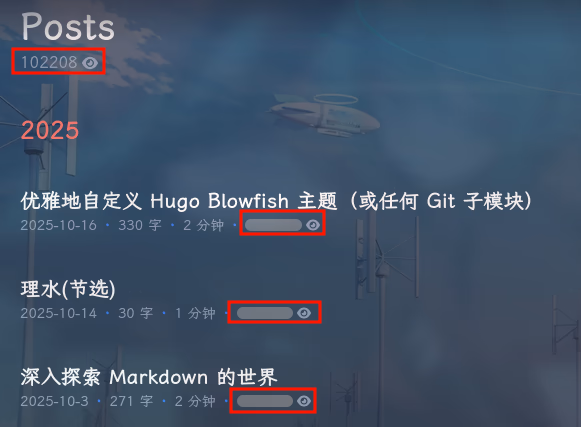 (😊别担心,后文有解决方法)
{{< /alert >}}
(😊别担心,后文有解决方法)
{{< /alert >}}
2.6.2 页尾显示
效果如下:
 新建
新建/layouts/partials/extend-footer.html并写入:
<hr><!-- Vercount浏览量组件 --><script defer src="https://events.vercount.one/js"></script><div class="flex flex-wrap gap-4 justify-center items-center text-sm text-neutral-500 dark:text-neutral-400"><span>📊 总访问 <span id="busuanzi_value_site_pv">-</span> 次</span><span>•</span><span>👥 总访客 <span id="busuanzi_value_site_uv">-</span> 人</span><span>•</span></div>{{< alert “circle-info” >}}
views.html定义了“本页访问量”,加上前文说过的“每个页面只能显示一个网站访问数”。所以这里的extend-footer.html没有定义“本页访问量”
{{< /alert >}}
2.6.3 “页头显示”的遗留问题解决
修改
views.html后,每个页面只能显示一个网站访问数,其他无法加载。而在”Posts” “最近的文章” 等页面,[article]下的showViews打开以后,会统统显示,导致异常。所以[article]下的showViews请false。
过来解决!
我们不使用[article]下的showViews,而是自定义一个功能一样的模块,只在正文上出现而不在”Posts” “最近的文章”出现即可
/themes/blowfish/layouts/_default/single.html复制到
打开/layouts/_default/single.html,查找
<div class="mt-1 mb-6 text-base text-neutral-500 dark:text-neutral-400 print:hidden"> {{ partial "article-meta/basic.html" (dict "context" . "scope" "single") }} </div>替换为以下内容即可
div class="flex flex-row flex-wrap items-center">{{ partial "article-meta/basic.html" (dict "context" . "scope" "single") }}<span class="px-2 text-primary-500">·</span>{{ partial "/meta/views.html"}}<!-- [INFO]此处调用了views.html并模仿软主题加了蓝·--></div>部分信息可能已经过时
